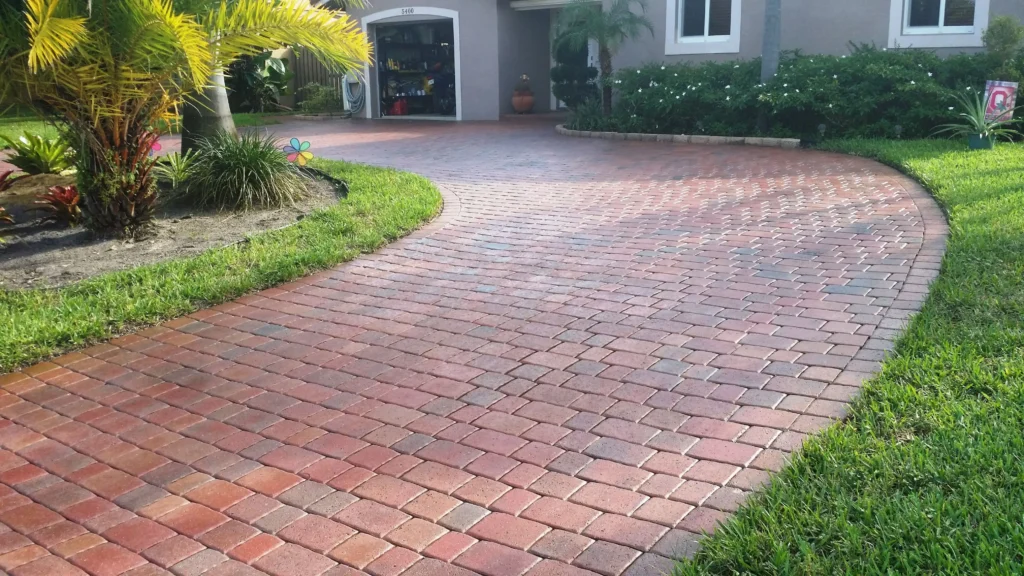
Have you ever experienced such a situation that your backyard looks boring and without life although it used to shine when it was first installed? That’s a common experience, almost everyone is dealing with it. Gradually the sun, rain, and the passing of people begin to rob your pavers of their bright and rich color which they looked very nice at the first time. But, what’s even better is that a change of color doesn’t mean a disaster of your pavers. On the contrary, you can restore faded pavers and restore paver color to give them a new life with only a little time and effort.
At Harrington Paving, we’ve helped hundreds of homeowners with paver repair. We’ve seen patios that looked worn out completely transformed in a single day using simple paving solutions. If your patio or walkway has lost its charm, don’t worry. With a few practical steps, you can restore paver color and make your outdoor space look new again.
How to Make Pavers Look New
Normally, to start your restoration process, you must carry out a proper cleaning – and not a fast one. Dirt, algae, and grime grow very slowly, and these small particles eventually take away the brightness from your pavers without you being aware of it. At some point, you will find that your outdoor area has changed its color to gray without your recognition.
Here’s how to restore paver color and bring back the original brightness:
1. Start with a proper wash
Use a stiff-bristle brush to gently scrub the surface with a mixture of mild detergent and hot water. No need for fancy tools just good old-fashioned elbow grease will do the trick.
2. Rinse it well
After cleaning, use a garden hose to rinse the area thoroughly. Do not frequently use high-pressure washers as they can remove the sand between your pavers.
3. Let it dry completely
Many people want to go directly to sealing, but patience will be rewarded. Moisture that is trapped can result in a whitish area after some time, so make sure the surface is thoroughly dry before you use the sealant.
4. Apply a color-enhancing sealant
That is the magical moment. Water and stain repellents of high quality for pavers not only protect the surface but also add the original color and the beauty of each stone of the paver. Go for the right one based on the material of your paver (brick, concrete, or stone).
5. Go for a “wet look” finish if you like shine
An emulsion for sealing with a shiny or wet-like effect gives your paving stones a more attractive and somewhat shiny look, similar to their original state. Those who want their property to appear freshly cleaned and maintained all the time use it as their top choice.
6. Maintain regularly
If you manage to fix it, the only work that remains will be cleaning it. In other words, you have to sweep regularly, wash from time to time, and reapply the sealant at least every two years. There are no other steps.
It is basically the same principle as with your car you maintain the shine, the surface is protected, and you avoid the need for major repairs in the near future.
Paver Repair
It’s a good idea to look for defects on the surface before you change the color or seal it. You could quite easily compare this process to repair the ceiling before painting the walls. Repairing little faults now will ensure that you don’t have a greater problem in the future.
Walk across your patio and look closely:
- Do any pavers wobble or feel uneven?
That usually means the base underneath has shifted. You can lift the loose pavers, add a bit of fresh sand, and place them back in line.
- See cracks or chip
Swap out the damaged pavers instead of leaving them. One broken piece can stand out like a sore thumb once you seal everything.
- Are the edges holding strong?
Over time, edges can move slightly due to rain or soil pressure. Tighten up the borders with edge restraints or fresh joint sand.
These small fixes make a world of difference. A smooth, even surface helps the sealant spread properly and gives your patio that professional, finished look and help you restore paver color
Paver Patio Restoration
Now the fulfilling phase of the service the complete renovation, which is what you wanted to show your colors after cleaning, drying, and leveling the surface.
Here’s how professionals do it (and you can too):
Step 1: Deep clean
Use a mild cleaner to lift off grime, mold, and stains. If your pavers are heavily soiled, a paver-specific cleaning solution works best.
Step 2: Repair and re-sand
After cleaning, refill the joints between pavers with fresh sand. This helps lock them tightly and prevents weed growth.
Step 3: Apply sealant
The sealant is the secret which turns everything into magic. Enter the sprayer or roller, and apply in thin and even layers. One should aim to cover the surface, not to go deep.
Step 4: Let it cure
New patio use should be delayed for 24 to 48 hours minimum. Proper bonding and hardening of the sealant are what this time interval is for.
The change will be obvious right away. Your pavers shall not only be a little deeper in color, be more even in texture and have a nice, bright look almost like a new outdoor area will be at your service.
A proper paver patio restoration not only revives appearance but also protects against future fading, weather damage, and erosion. It’s one of those small investments that pays you back in both looks and longevity.
FAQs
How often should I reseal my pavers?
Most experts suggest resealing every 2 to 3 years. It depends on the weather and how much foot traffic your patio gets.
Can restore faded pavers’ colors without sealing?
Cleaning helps, but sealing is what really locks in the color and protects it from fading again.
What’s the best cleaner for faded pavers?
A mild dish soap or a paver-safe cleaner works great. Avoid strong chemicals like bleach — they can strip color and damage the surface.
Do I need to hire professionals for paver repair?
Small fixes like replacing or leveling a few pavers can be done on your own. But if you notice wide uneven areas or drainage problems, professional help is best.
Why do pavers fade over time?
It’s mostly from UV exposure, rain, and daily wear. The pigment in the surface slowly breaks down, which is why sealing is so important.